Showing posts with label DIY. Show all posts

Sunday, February 24, 2013

DIY | Organizing Personal Files


I think that I might be obsessed with Pinterest.  And although most of my pins sit there unclicked, sometimes I go all out and decide to go through with the ideas I find on the site.  The lasagna recipe was one that I found using Pinterest, and I LOVE finding lesson plans on there.  I recently found some organizing inspiration that took me to The Weekend Organizer.   She has some seriously amazing information about personal files, how long to keep them, how to organize them, and what's important or not.  As a newbie to the "real world," I've never had to keep up with important documents like  a lease, contracts, warranties, insurance information, marriage certificate, birth certificates [you get the point].  I have honestly not been very good at keeping these extremely important documents organized...I'm ashamed to admit that they have been tossed in the top drawer of my filing cabinet without a real home.  The Weekend Organizer uses a great color coded filing system using special hanging files that allow you to see your file folders.  It's so much easier to just make a new file folder than a new tab on a hanging folder.  I loved that idea, but I couldn't find the special "top rail" folders in a store, so when I got home I decided to shorten my hanging folders so that I could see my file tabs.  My first step was honestly not making the folders...my first step was going through my entire filing cabinet and organizing my documents by category.  I ended up with an entire trash bag of old and outdated files for shredding.  After that, I created my folders with the tabs labels, and THEN I could start the fun part! [making the new, shorter hanging folders]
First, you need to fold the hanging file inside out, and then use the lines on bottom to help you fold it out.  I folded mine out by 2 lines on each side on the bottom.
I will look like the file on the right.  Then, tape the bottom, and insert your folders!

You're done!

[Ps...my cute file holder is from Target, about 2 years ago!]

Pps...I did a whole "apartment storage ideas" post on my other blog HERE if you want to creep my house :)]

Ppps haha...I know that some of this should be in a safe...and some of it is.  I need a bigger fire-proof safe!

Tuesday, February 19, 2013

DIY Radial Weaving

So for tonight's post I'm going to have a little "art teacher moment."  I think I've told several people that I would do a DIY on how I create these radial weavings with my kids, and I never have.  I made some of these for fun in my old apartment and made it into a lesson.

[Disclaimer...I know this isn't really "weaving," but whatevs]

For this DIY you will need...

To start off, you will want to cut a circle out of the chip board [I used a cereal box], and you will need to draw 16 evenly spaced lines on the back and label them clockwise:
After that, you will want to cut the little lines to create notches.
Then, measure and cut the yarn.  The amount will depend on how big your circle is.  I used about 4 arm lengths [stretching my arms out while holding the yarn].  If you run out of yarn before you finish, you can just cut more and tie it on.

Here comes the "fun" part! [sarcasm...it's a little confusing unless you're doing it.]

1)  Start by sticking the end of the yarn into the "1" notch.  Leave a little bit hanging to tie it up later.  You will be wrapping the yarn around the board from front to back.
2)  You will go from the 1 to the 8 around whichever side is the front.
3)  This is what the front looks like.
4)  Then go from the 8 to the 16 across the back, then the 16 to the 7 across the front [if you are doing this you will see a pattern]
I always look at the back the whole time because it's easiest.  On the back you will see the left image, and on the front it will look like the right image.  This is one rotation around the circle.  You will do exactly what you just did, starting with 1 to 9, 9 to 16, 16 to 8, etc. [Easier to understand if you're doing it!]  So go around the circle 2 times total.
Tada!  Turn it over and see what you made!
If 9 year olds can do it, you can do it!  Here are some by my students:
Here are some photos from my old apartment with my "rough draft" versions of these weavings [they are a little bit different, but practice makes perfect!]  Happy weaving!

Friday, February 8, 2013

Easy No Sew Curtains

Good evening, everyone! Tonight I am going to show you how to create curtains with no sewing. I'd rate this project in a couple of ways:
Skill Level-Easy
Time Needed-Moderate
Price-That depends--do you already have a ton of fabric? If yes, it could be free!

Here's what you need:
Scissors
A straight edge
An iron
A tape measure
A hot glue gun
Lots of hot glue gun sticks
Lots and lots of fabric

About a year ago, before I got married, I was inspired by Nate Berkus to "upholster" my walls. The idea is that if you are renting a home and can't paint the walls, you can always cover the walls with fabric. Liquid starch acts like glue, holding the fabric to the wall. When it's time to move, you just wet the fabric and the starch is neutralized. It's supposed to peel right off! As you can tell by the language of that sentence, I don't know if it peels right off. I never did the project. I did, however, START the project by buying lots and lots of fabric ($$$). When Doug and I got married and moved, the never-used fabric needed a project. I decided to make a curtained wall panel behind our bed, like a faux headboard, with matching curtains.  The main problem is---I can't sew. My sewing machine has been broken for about as long as I've had it.

NO SEW CURTAINS IT IS!

So...I started with a chevron print fabric I purchased online. It was a HUGE roll of some canvas-y type fabric. The roll (and fabric on the roll) is naturally 57 inches wide. I did not cut the sides of the fabric--I maintained the width completely so that I wouldn't have to finish the sides. One panel was plenty wide to cover a whole window.

Step 1: I measured our wall from floor to ceiling and decided that a 7 foot length panel would be plenty long. I added about 6 inches so I could fold the top down to create a loop for the curtain rod.

Here's where we are so far: 57 inch wide panels that are cut to be 7.5 feet long. I didn't know how crowded 1 panel would look on a window, so I cut 5 panels. I figured I could put 3 behind our bed and 2 over the window. We really only needed 1 per window, so I ended up with 1 extra panel. I eventually used the extra to create a "nook" in our hallway--more on that in another post!

Step 2: Lay panel on a flat surface backwards--you should be looking at the side that will be facing the window.  Fold top of panel down about 3-6 inches. I did 6 inches, but it wasn't necessary to have that much room for the curtain rod.

Step 3: Iron a crease into the fabric where you have folded the top of your curtain panel. I did this so that I wouldn't end up gluing the fabric in a crooked line.  If you are really good at eye-balling the measurement, you don't have to do this part!

Step 4: Hot glue the flap you've just folded down to the back of the main panel.

Step 5: If you want a really finished look, repeat this step on the bottom of the panel. I didn't, and the fabric I used hasn't frayed or started coming apart. I suppose the necessity of this part depends on the fabric you choose.

All that's left is to hang and enjoy! All in all this project took me about 3 hours. I'm a very slow measure-er and I'm terrible at cutting straight lines. I moved very slowly to ensure minimal mistakes!

The panels behind our bed.

The curtain covering the window--and bonus! The necklace holder from one of our first tutorials!


Wednesday, January 30, 2013

CD Cover DIY

I give lots of CD's away whether for photography or mixed CD's, and sometimes it's nice to have simple, cute packaging for them.

All you need for today's DIY is:

-Scissors
-Glue
-A paper CD cover to trace
-Some decorative paper
[Needs to be at least 12 inches tall]
I use vintage wallpaper, so I have to be really gentle.  I would suggest using a paper that is at least as thick as construction paper. 

1.) First, take apart the paper CD cover that you want to trace.
2.) Trace the CD cover onto the back of your decorative paper.
3.) Cut it out

4.)  Fold the sides and the top
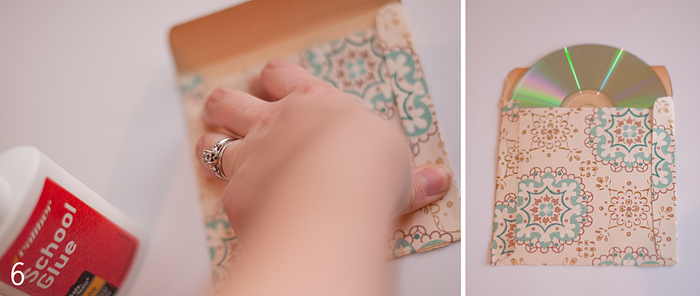
5.) Glue the sides so that you can fold down the edges.

 6.)  Firmly press down the edges.


You're finished!  Now go give someone special those sweet photos or tunes they've been waiting for!

Tuesday, January 29, 2013

Tree Branch Necklace Stand DIY

Hello, everyone!  Today's easy project was inspired by an attempt to organize my jewelry box. I wanted a way to organize my necklaces so that I would feel inspired to wear them.  I am a firm believer in trying to do things simply and inexpensively, and today's DIY is both cheap and easy! You won't even have to leave your yard!

For this Tree Branch Necklace Stand you will need only 3 or 4 things:
1. Several thin branches from a young tree or bush.
2. A vase
3.Necklaces
4. Rubberband/String/Twine (optional)

Step 1: Head outside and cut or break off several thin branches from a young tree or bush. I happened to have both, so I grabbed a couple branches from each plant.  Make sure you pull the leaves off the branches (or collect them in the winter when there are no leaves!).   Tip: You don't want to pull the leaves off in a way that will strip the branch. It's good for it to have little knobs or smaller branches coming off of it. Not only is it beautiful, the bumps and grooves help hold the necklaces in place.

Step 2: Arrange your branches in a lovely vase. It can be any size that is tall enough to support your branches. This is where the string/rubberband/ twine comes in. My vase has a wide enough mouth that the branches don't stand up well inside of it. If I gathered more I could possibly have enough that the branches could support one another, but I like the aesthetic of having just a few. Typing or banding the bottom of the branches help them stay clustered together, rather than drooping all around a wide mouth vase. Again, this stage is optional. If you have a vase with a small opening, or like the look of the branches sitting a little lower and being more spread out--you don't need to bind the branches.

Step 3. Display all your darling necklaces!


Happy DIY-ing!